Squishy brakes? Here’s how to bleed your brakes yourself
Don’t panic. If your brake pedal feels squishy or spongey, you might just have some air in your system. The remedy? It’s time to bleed your brakes. Don’t worry, though; with the right tools, you can do it yourself!
If that brake pedal or lever feels spongey, you might need to bleed your brakes in five easy steps
You’ll need a few things first. For starters, you’ll need a bleeder kit or a soda bottle with clear tubing and brake fluid. Fill the bottle partially with brake fluid. It’s a good idea to drill a small vent hole in your bottle lid, too. Now, we can get started.
- Check your brake fluid and add as needed
Find your brake master cylinder reservoir. Remove the lid, clean the opening, avoid contamination, and top it off with fluid. Failing to start with a sufficient level can allow air in, making the whole process moot. Reinstall your cap.
- Bleed your calipers in order, starting with the passenger-side rear unit
Start with the caliper furthest from the brake master cylinder. On the majority of vehicles, the master cylinder is on the driver’s side front, meaning right in front of the driver. So, start with the passenger-side rear unit and move to the driver’s side rear. Then, move up to the passenger-side front and finish at the driver’s side front. Reverse the process for vehicles with a rear-mounted ABS module.
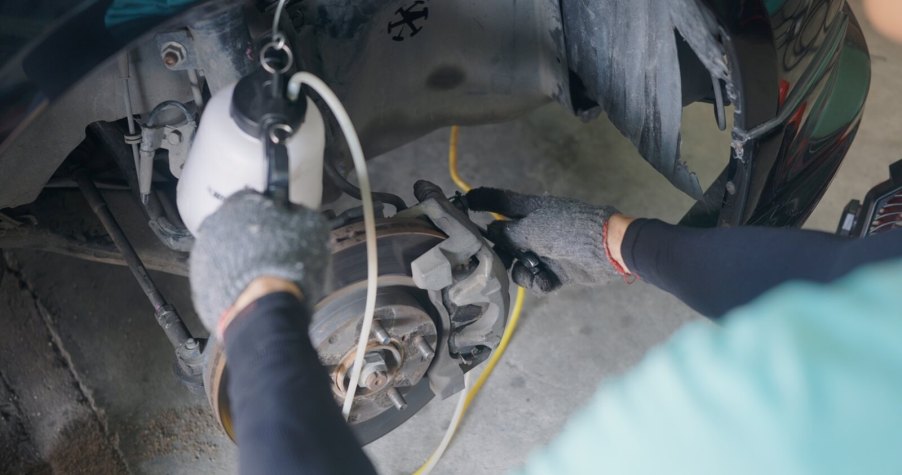
- Attach your clear tubing
To start bleeding your brakes, attach your bleeder line to the top of the bleeder screw assembly. Make sure you get a tight fit. Position your bottle or bleeder kit above the disc and caliper.
- Pump your brake pedal, bleed, and repeat
Some mechanics like to use the “open, press, hold, close” reminder when servicing brakes. Open the bleeder screw, press the pedal, and keep it depressed. Then close the bleeder when you’re finished and release the pedal. Remember to just barely open the screw; you don’t want leakage around the threads.
Repeat until your hose is clear of bubbles. When you’re finished with a caliper, close your bleeder screw before removing the line. Check your master cylinder after each caliper. Add fluid as needed.
Be careful, though. Giving the brake pedal too much influence during the process, like jamming it to the floor, can ultimately ruin your brake master cylinder seals. Instead, push the pedal to where it would typically be during hard braking. Also, don’t forget to hit every caliper.
- Clean up and do your final checks
Don’t forget to clean up and dispose of excess automotive fluids responsibly. If you remove your wheels and tires, make sure your lug nuts are securely in place before attempting to drive.
Check out a helpful video below!


