‘Nobody talks about this product’ Pro detailer shows how to restore your car’s plastic exterior trim for less than 50 bucks
Where’s the Easy Button? Brandon Wagstaff, a vehicle detailer out of Huntington Beach, California, just shared a tip worth trying. If your car’s exterior plastic trim is looking gray and faded, check out his method. The best part is, it’ll only take about 45 bucks and a small bite of a Saturday.
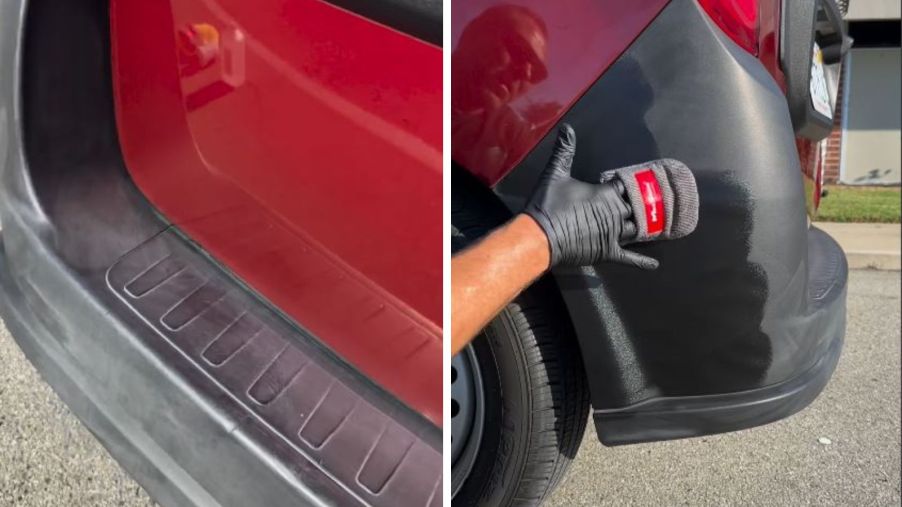
How to restore your car’s plastic exterior trim, according to a pro
Step 1: Prep the surfaces
Brandon says to start by taking an alcohol-based solution and a clean microfiber towel.
“Wipe that plastic as good as you can.” Then, do it again.
“You have no idea how much stuff gets caked on that bumper.” Bugs, dirt, grime, and tar, to name a few.
Anyway, wipe all the trim down until it’s just clean, bare plastic.
Step 2: Apply the product
Brandon uses a trim restoration product called Solution Finish. A 12-ounce bottle runs about $40 online. In the comments, Brandon says he gets it at a local retailer for $30.
What’s the secret to the solution? The bottle contains a black dye.
“It lasts multiple years, you guys.”
Use a microfiber applicator like Brandon has in the TikTok. “It only takes a few minutes to bond.”
Step 3: Buff
Once the product sets, you just take a clean microfiber towel and buff, buff, buff. You’ll need more than one towel.
Once the towel you’re using shows zero product coming off, you’re done.
Brandon warns that this stuff stains any and everything it touches: “So wear dark clothing.”
Commenters criticize the technique, but they’re wrong
Some people claimed that using an alcohol solution to clean exterior plastic trim will “melt” it.
“Why would you use alcohol? It melts plastic, that’s why your rags come out black.”
Hm.
This idea usually comes up when the trim looks faded or streaky after cleaning.
But here’s the truth: Isopropyl alcohol doesn’t melt plastic. What it can do is dry it out or cause temporary discoloration if used the wrong way.
This issue often comes up when prepping trim for a dye-based restorer. The detailer used alcohol to strip away oils, wax, or silicone from the surface so the dye could bond better.
That’s a standard and necessary step before dying it.
If the trim looked faded afterward, it wasn’t because the alcohol “melted” it. It’s because it revealed how dried-out or neglected the plastic already was under all the old dressings.
Leave it without dying, like the folks recommending using Armor-all or anything without black coloring, and yeah. It’ll just look faded again once the product wears.
Used correctly, alcohol is one of the best tools for getting your trim ready for a long-lasting dye-based restorer.
Mixing your own alcohol solution to prep your car’s plastic trim
Combine one part isopropyl alcohol with two to three parts water. A 70% alcohol base works well. Don’t use 99% alcohol or rubbing alcohol with perfumes or moisturizers. Those are meant for hands, not cars.
Put the solution in a spray bottle. Spray it onto a microfiber towel, not directly onto the trim.
Wipe down the plastic to remove residue, then immediately dry the area with a clean towel.
Don’t let the solution sit or dry on the surface. That’s where some people run into trouble: alcohol left to air-dry can leave streaks or blotches, especially on black or textured trim.
Always test the solution on a small, hidden area first. If it passes the test (no fading, no white marks) you’re good to go.
MotorBiscuit reached out to Brandon Wagstaff through his company’s Instagram account, @wagstaffautodetailing, for comment.


